How to reate a memory safe cross platform plugin with C++

Apart from robotics, I am also interested in how the software architectures behind most software projects play their roles in how the project will head to success or decay. Such design decision may become even more acute when the project at stake involves more than one team member as the cost for orchestration and collaboration will directly affect how the end-product appears to the user and thus would emerge as one of the most important factor that the architect or project manager would be aware of.
Hence, I would also like to present my thoughts and implementations of some crucial software architecture designs that I am using in my robotics project. This series of articles are my own reminders and I hope that it would also help in somehow if that is possible.
Introduction
What is a plugin system? For me, a plugin is a patch to modify the working logic, characteristics, or features of an existing feature in a software codebase. I first got in touch of such concept in the ROS Navigation stack as it enables the developers to add their own mapping layers as well as motion planning algorithms while the addition of a plugin does not require the original code base to be modified to fit the new changes. Another use case is the patches in some videogames as you can mod a game’s objects to significantly change the way you play a certain game, which is literally “game-changing” no puns intended. A plugin system offers the flexibility for the users to modify the codes while at the same time adheres to the best practice of Open-Close principle.
But then the next question becomes: How to make the plugin design memory safe? This is a crucial problem especially in lower to medium level programming languages like C++, which is the language that I want to demonstrate in this article. I have observed that the existing C++ implementation of plugin relies on raw poointers to load in the plugins that makes me question whether it is prone to memory leak if these ointers are mishandled by the developers. Fortunately, we can use the modern C++ smart pointers and libtools library to ensure that we can get the best of both worlds. Besides, one good aspect of creating the plugin scheme with libtools also properly addresses the cross-platform compatibility so the plugin architecture can work on both POSIX and Windows machines.
Why cross-platform is a big plus here? As we roboticisists are migrating to ROS 2 as ROS 1 reaches its end of life (EOL) as may 2025 is closing in soon, we can also embrace the fact that ROS2 packages can be executed on both POSIX, embedded, and Windows systems. To be able to run the same plugins, e.g. motion planning algorithms, on the mentioned operating systems, our code should stand against the challenges of different system’s environment. Fortunately, libtools is the appropriate library to be used to craft our plugin architecture. With this said, outside of the robotic field, the same requirement also applies in one way or the other.
Now, let’s jump straight in on how to craft such plugin architecture. Please make sure you are equipped with the following:
- POSIX machine. I am developing under Ubuntu 22.04 LTS
- C++20
- gcc and g++
- CMake
- A good IDE, e.g. Visual Studio Code
Understanding the plugin architecture
There are two types of plugins: Static and Dynamic. I will further elaborate in a new post what differences there are between the static and dynamic libraries. The difference lies in how the plugins are compiled, linked, and loaded. Which type of libraries should be your plugin depends on your design criteria and your actual application. For instance, under the ROS2 Navigation stack scenario, the base motion planner would need the motion planning algorithm to be loaded in prior to execution so it can return with the planned path during the whole execution stage. In this case, a static plugin might be ideal since we are not going to change it frequently at runtime. But what if we want to evaluate the differnet motion planning algorithms while the motion planner is running? Then the motion planner faces the scenario that it is impossible to know which plugin will be applied beforehand and therefore a dynamic plugin compilation would be more ideal.
But how does the plugin interact with the main process? Imagine that your want to build a mod for your favorite videogame such as Subnautica, you learn that each object in the game is a base class whose characteristics and behavior can be modified or “decorated” by a patch or plugin. Namely, the plugin architecture can be regarded as a mere class inheritance or an actual use case of the Decorator Pattern. In simple terms, the plugin as a derived class possesses the members and methods as the bsae class or the object in the game it wants to decorate, and simply modify the behavior or inherited members within the overriden methods and it effectively chanes the characteristics of the target object.
But here we don’t want to get too far into the videogame modding. Instead, in this article I will only exemplify with a base class and a derived class as its plugin and how this plugin is loaded afterwards by the program’s user.
Memory safety in plugin development
But before we begin our plugin example, I also want to discuss a little bit about the memory safety issue that plagued low to medium level programming language when coming to pointer manipulations. This topic is also why a lot of software development companies and professionals are inclined to adopt Rust as their main framework language instead of continueing with C/C++. However this being said, I still want to take advantage of the smart pointers from the modern C++ standard library to justify that the implementation of plugins through C++ polymorphism can still achieve automatic garbage collection at a slight overhead cost. The smart pointers (std::unqiue_ptr and std::shared_ptr) automatically delete the target memory when it determines that the instance goes out of scope and they play an essential Resource Acquisition Is Initialization (RAII) role that raw pointers lack thereof.
Cross-platform Considerations
As I mentioend previously, plugins are materialized as shared libraries and loaded into the main program. Different operating systems have their corresponding library file foramt: on POSIX systems the libraries end with .so and on Windows with ,dll respectively. On top of that, the operating systems have their own library and function to interact with the plugins: dlopen() in the POSIX systems and LoadLibrary in Windows. Fortunately, libtools serves as a light-weight wrapper to make the plugin loading operating-system-agnostic, convenient for my case. [1]
And for the main code base, we also count with CMake up in our sleeves to leverage its cross-platoform compilation capability.
Designing the plugin interface
Here I am want to exemplify the plugin architecture by having different animals inheriting a base class, or in Java language terms an interface, from which the plugin classes need to inherit from. In order to encapsulate the instantiation process, I will also adopt the factory pattern to encapsulate the instantiation task and make the code cleaner. With the mentioned procedures, we ensure that the program works as a Application Binary Interface (ABI).
Implementing the plugin systems
As mentioned, the example will have the animals make their respective sounds. The Animal class serves as the base class and Lion class is the plugin. And don’t worry, you can always refer to the repository plugin_architecture_exercise for the actual code if you find yourself lost in the instructions.
The static class diagram is as follows,
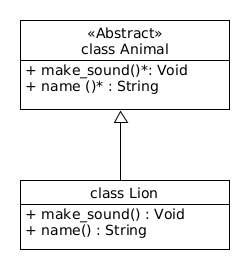
First, let’s build up the back-bone of the main pipeline. The code is depicted below. The user is expected to pass in the configuration YAML file path, which later would be crucial to let the program know where to find the plugin.
/* main_pipeline.cpp */

#include <iostream>
#include <filesystem>
#include <yaml-cpp/yaml.h>
#include <string>


std::string print_usage(const std::string& program_name) {
    std::stringstream stst;
    stst << "Usage: " << program_name << " <config_file>" << std::endl;
    return stst.str();
}

int main(int argc, char** argv) {
    std::cout << "Launching main pipeline" << std::endl;

    if (argc != 2) {
        std::cerr << print_usage( std::string(argv[0]) ) << std::endl;
        return EXIT_FAILURE;
    }

    // check if the config file exists
    std::filesystem::path config_file(argv[1]);
    if (not std::filesystem::exists(config_file)) {
        std::cerr << "Config file does not exist: " << config_file << std::endl;
        return EXIT_FAILURE;
    }

    if (config_file.extension() != ".yaml") {
        std::cerr << "Config file must have a .yaml extension" << std::endl;
        return EXIT_FAILURE;
    }

    std::cout << "Loading config file: " << config_file << std::endl;
    YAML::Node config = YAML::LoadFile(config_file.string());

    return EXIT_SUCCESS;
}
The configuration YAML file would content similar content as the following:
# your YAML file to load in the plugin

animal_library: "/home/charlyhuang/Documents/plugin_architecture_exercise/lib/liblion.so"
Which holds the key animal_library and the absolute file path as its value.
Before we start with the plugin interface or the base class specifying how each plugin class should look like, let’s deal with the plugin loading pointer:
/* plugin_core.h */

#ifndef _PLUGIN_CORE_H_
#define _PLUGIN_CORE_H_

#include <string>
#include <dlfcn.h>
#include <memory>

// functor of custom deleter for the dynamic library handle
struct DLCloseDeleter {
    void operator() (void* handle) const {
        if (handle != nullptr)  dlclose(handle);
    }
};

typedef std::unique_ptr<void, DLCloseDeleter> DLibHandle;

#endif // _PLUGIN_CORE_H_
This implementation ensures that the plugin loading and removal process will properly release the plugin’s resource once ending its use.
Next, the interface or the base class to be inherited by the plugin classes.
/* animal.h */

#ifndef ANIMAL_H
#define ANIMAL_H

#include <string>
#include <memory>

#if defined(_MSC_VER)
    #define ANIMAL_EXPORT __declspec(dllexport)
    #define ANIMAL_IMPORT __declspec(dllimport)
#elif defined(__GNUC__)
    #define ANIMAL_EXPORT __attribute__((visibility("default")))
    #define ANIMAL_IMPORT __attribute__((visibility("default")))
#else
    #define ANIMAL_EXPORT
    #define ANIMAL_IMPORT
#endif

#ifdef BUILDING_ANIMAL
    #define ANIMAL_API ANIMAL_EXPORT
#else
    #define ANIMAL_API ANIMAL_IMPORT
#endif

class ANIMAL_API Animal {
    public:
        Animal() = default;
        virtual ~Animal() = default;
        virtual void make_sound() const = 0;
        virtual std::string name() const = 0;

        typedef std::unique_ptr<Animal> Ptr;
};

extern "C" ANIMAL_API Animal::Ptr create_animal();

#endif // ANIMAL_H
Let’s break down the code. First, the header guards (#ifndef, #define, #endif) prevent multiple inclusion of this header file and avoiding further compilation errors.
Next, the following piece of code is the export / import macros for shared libraries:
#if defined(_MSC_VER)
    #define ANIMAL_EXPORT __declspec(dllexport)
    #define ANIMAL_IMPORT __declspec(dllimport)
#elif defined(__GNUC__)
    #define ANIMAL_EXPORT __attribute__((visibility("default")))
    #define ANIMAL_IMPORT __attribute__((visibility("default")))
#else
    #define ANIMAL_EXPORT
    #define ANIMAL_IMPORT
#endif
This section helps define the macros for cross-platform shared library support. __declspec(dlexport) exports symbols when building a DLL on Windows. __declspec(dllimport) imports symbols when using a DLL on Windows. __attribute__((visibility("default"))) does the same action for Linux / MacOS (GCC / Clang). And if none of these compilers are detected, the macros default to epty, meaning no special export behavior.
We can see there are two pure virtual methods that most be implemented by the derived classes, i.e. the plugin classes. Alternatively you can Understand that, apart from implementing the whole functionality that the author sets up to do, a plugin can serves as a decorator of the interface (base class) of an already existing object in the original codebase.
The next section is the conditional compilation for buiding vs using the library. Let’s bring up the code:
#ifdef BUILDING_ANIMAL
    #define ANIMAL_API ANIMAL_EXPORT
#else
    #define ANIMAL_API ANIMAL_IMPORT
#endif
BUILDING_ANIMAL is a preprocessor flag set when compiling the library. When building the library (BUILDING_ANIMAL is defined), ANIMAL_API expands to ANIMAL_EXPORT, making symbols available for others to use. Conversely, when using the library (BUILDING_ANIMAL is not defined), ANIMAL_API expands to ANIMAL_IMPORT, indicating these symbols come from an external shared library.
With the macros defined, let’s see how the abstract base class or interface Animal should be implemented.
class ANIMAL_API Animal {
    public:
        Animal() = default;
        virtual ~Animal() = default;
        virtual void make_sound() const = 0;
        virtual std::string name() const = 0;

        typedef std::unique_ptr<Animal> Ptr;
};
The ANIMAL_API ensures that the Animal class is properly exprted or imported. Animal is an abstract class because it contains two pure virtual functions needed to be implemented by the plugins inheriting from the abstract class.
The typedef std::unique_ptr<Aniaml> Ptr; is declared to follow a factory pattern.
Speaking of factory, the following line:
extern "C" ANIMAL_API Animal::Ptr create_animal();
is the factory function for creating an Animal object in terms of plugin. The expression extern "C" prevents C++ name mangling, ensuring the function can be easily linked with C-style function names. This expression is useful for dynamic loading of shared libraries (.dll, .so, .dylib). But what about create_animal()? This function is a factory function intended to create an Animal object dynamically. THe implementation will be provided in a .cpp file, typically returning a std::unique_ptr to an instance of a derived class (e.g., ``Dog, Cat`).
This design allows the Extensibility of other plugins e.g. Lion, Dog, or Cat from Animal. This design also ensures Encapsulation through a polymorphic interface and promotes modularity to load the plugin during runtime.
Once the interface is declared, let’s craft our plugin
/* lion.h */

#ifndef LION_H
#define LION_H

#include <iostream>

#include "animal.h"

class Lion : public Animal {
    public:
        Lion() = default;
        void make_sound() const override;
        std::string name() const override;

        typedef std::unique_ptr<Lion> Ptr;
        static Ptr create() { return std::make_unique<Lion>(); }
};

#endif // LION_H
and its corresponding CPP file:
/* lion.cpp */
#include "lion/lion.h"

void Lion::make_sound() const {
    std::cout << "Roar!" << std::endl;
}

std::string Lion::name() const {
    return "Lion";
}

extern "C" Animal::Ptr create_animal() {
    return Lion::create();
}
We are almost there! One last step. Now let’s make our main pipeline complete. Get back to the main_pipeline.cpp that appears at the start of the post, let’s add the lines to actually load in the plugin.
#include <iostream>
#include <filesystem>
#include <yaml-cpp/yaml.h>
#include <string>
#include <dlfcn.h>
#include "plugin_core.h"

#include "animal.h"

Animal::Ptr load_animal(const std::string& animalLib, DLibHandle& pluginHandle);


std::string print_usage(const std::string& program_name) {
    std::stringstream stst;
    stst << "Usage: " << program_name << " <config_file>" << std::endl;
    return stst.str();
}

int main(int argc, char** argv) {
    std::cout << "Launching main pipeline" << std::endl;

    if (argc != 2) {
        std::cerr << print_usage( std::string(argv[0]) ) << std::endl;
        return EXIT_FAILURE;
    }

    // check if the config file exists
    std::filesystem::path config_file(argv[1]);
    if (not std::filesystem::exists(config_file)) {
        std::cerr << "Config file does not exist: " << config_file << std::endl;
        return EXIT_FAILURE;
    }

    if (config_file.extension() != ".yaml") {
        std::cerr << "Config file must have a .yaml extension" << std::endl;
        return EXIT_FAILURE;
    }

    std::cout << "Loading config file: " << config_file << std::endl;
    YAML::Node config = YAML::LoadFile(config_file.string());

    std::string animalLib = config["animal_library"].as<std::string>();
    DLibHandle pluginHandle = nullptr;
    Animal::Ptr animal = load_animal(animalLib, pluginHandle);

    if (animal == nullptr) {
        std::cerr << "Failed to load animal" << std::endl;
        return EXIT_FAILURE;
    }

    std::cout << "Animal loaded: " << animal->name() << "  ";
    animal->make_sound();
    std::cout << std::endl;

    return EXIT_SUCCESS;
}

Animal::Ptr load_animal(const std::string& animalLib, DLibHandle& pluginHandle) {
    pluginHandle = DLibHandle(dlopen(animalLib.c_str(), RTLD_NOW));
    if (pluginHandle == nullptr) {
        std::cerr << "Failed to open library: " << dlerror() << std::endl;
        return nullptr;
    }

    typedef Animal::Ptr (*create_animal_t)();
    create_animal_t create_animal = nullptr;
    create_animal = reinterpret_cast<create_animal_t>(dlsym(pluginHandle.get(), "create_animal"));

    if (create_animal == nullptr) {
        std::cerr << "Failed to find create_animal symbol" << std::endl;
        return nullptr;
    }

    return create_animal();

}
In the code aboce, the function load_animal() is added into the code, leveraging the memory safety of the smart pointer, we instantiated animal from the plugin we loaded into the program. The function load_animal() is the most crucial key section in the pipeline on how to load the plugin. Let’s break it down.
In the function load_animal we have the first line:
pluginHandle = DLibHandle(dlopen(animalLib.c_str(), RTLD_NOW));
This line loads the plugin into the memory. dlopen() is a POSIX function (Gosh we will replace this function in the future. Hang in there) that takes the library path as a C-style string. THe RTLD_NOW flag means “resolve all symbols immediately”. Once the plugin is loaded into the system memory, a handle is returned and assigned to pluginHandle. Note that this handle is already wrapped in a smart pointer to ensure memory safety.
In the lines
typedef Animal::Ptr (*create_animal_t)();
create_animal_t create_animal = nullptr;
we define a function pointer type create_animal_t. This type represents a function that takes no parameters and returns an Animal::PTr pointer.
Then comes the critical line
create_animal = reinterpret_cast<create_animal_t>(dlsym(pluginHandle.get(), "create_animal"));
dlsym is used to look up for the symbol called create_animal in the loaded library. Recall in our previous implementation, create_animal was defined alongside the abstract factory function. If dlsym finds the symbol, the returned symbol is casted to our function pointer type, which in turns looks for the plugin’s factory function to create the plugin Animal object.
In summary, the load_animal function calls the factory function we retrieved from the plugin and returns the created Animal object. So the steps it has taken is as follows,
- Loading in a dynamic library
- Finding a factory function in the plugin
- Using the function to create an instance of our plugin class
- All while providing the proper error handling
That’s all to it! Congratulation! You are done! This completes the skeleton for your plugin architecture.
Now, let’s move on to CMakeLists.txt.
CMakeLists.txt
# Root CMakeLists.txt

cmake_minimum_required(VERSION 3.20)
project(PluginArchitecture)

set(CMAKE_CXX_STANDARD 20)
set(CMAKE_CXX_STANDARD_REQUIRED ON)

# The built binaries should be placed at bin/ directory
set(CMAKE_RUNTIME_OUTPUT_DIRECTORY ${CMAKE_SOURCE_DIR}/bin)
# The build libraries should be placed at lib/ directory
set(CMAKE_LIBRARY_OUTPUT_DIRECTORY ${CMAKE_SOURCE_DIR}/lib)
set(CMAKE_ARCHIVE_OUTPUT_DIRECTORY ${CMAKE_SOURCE_DIR}/lib)

# Load in yaml-cpp and if it does not exist in the system,
# automatially get it from the internet
# First try to find yaml-cpp on the system
find_package(yaml-cpp QUIET)

if(NOT yaml-cpp_FOUND)
    message(STATUS "yaml-cpp not found on system, fetching from GitHub...")
    include(FetchContent)
    FetchContent_Declare(
        yaml-cpp
        GIT_REPOSITORY https://github.com/jbeder/yaml-cpp.git
        GIT_TAG yaml-cpp-0.7.0
    )
    FetchContent_MakeAvailable(yaml-cpp)
else()
    message(STATUS "Found yaml-cpp on system")
endif()


include_directories(include)
add_subdirectory(src)
The CMakeLists.txt above is the main CMakeLists that will orchestrate the other CMakeLists.txt in the project’s subdirectories. The CMakeLists.txt here simply wants to let the compiler know that the built binaries will be stored in the bin/ directory under the project root directory and libraries and plugins under the lib directories. Next, we use the yaml-cpp library to enable reading from the YAML files. Thanks to FetchContet if there is no existing library in the system then FetchContent can “download and install” it directly from the internet. Sweet!
And for the plugin, the CMakeLists.txt resembles the following for our Lion plugin:
add_library(lion SHARED
    lion.cpp
)

target_include_directories(lion
    PUBLIC
        ${CMAKE_SOURCE_DIR}/include
    PRIVATE
        ${CMAKE_CURRENT_SOURCE_DIR}
)

target_link_libraries(lion
    PUBLIC animal
)
We link the Lion plugin library from the public ANIMAL base class library, and itself is a shared library.
With the CMakeLists.txt ready, we can build the project. Please insert the commands in a terminal tab:
# Generate Makefiles under the "build" directory
cmake -B build

# Build the project
cmake --build build
You will find that all Makefiles and related assets are placed under the build/ diectory while the binary or executable files will be generated under the bin directory and libraries under the lib directory. Please adjust the absolute path to the plugin library in your YAML file such that the main pipeline is able to successfully loading it in.
Perfect, Asuming that you already specified the animal_library value in your YAML file, let’s run our program:
# assume you are under the project's root directory
cd bin

# run the program on Linux
./main_pipeline path/to/your/yaml/file.yaml

# or run the program on Windows
main_pipeline path\to\your\yaml\file.yaml
You should expect to see the follwoing response:
Launching main pipeline
Loading config file: "/path/to/your/yaml/file.yaml"
Animal loaded: Lion  Roar!
Here kist replce the YAML file path example with your actual file path.
Congratulations! You just created and executed a plugin pipeline! Way to go!
Wait! How do you verify that the plugin pieline is memory safe?
Good question. To answer this question, make sure that in a POSIX machine, you have Valgrind installed. If not, simply install it with the command:
sudo apt install -y valgrind
Now, run the same program using Valgrind on Linux:
valgrind ./main_pipeline path/to/your/yaml/file.yaml

# Response
==6384== Memcheck, a memory error detector
==6384== Copyright (C) 2002-2017, and GNU GPL'd, by Julian Seward et al.
==6384== Using Valgrind-3.18.1 and LibVEX; rerun with -h for copyright info
==6384== Command: ./main_pipeline path/to/your/yaml/file.yaml
==6384==
Launching main pipeline
Loading config file: "path/to/your/yaml/file.yaml"
Animal loaded: Lion  Roar!

==6384==
==6384== HEAP SUMMARY:
==6384==     in use at exit: 0 bytes in 0 blocks
==6384==   total heap usage: 319 allocs, 319 frees, 114,079 bytes allocated
==6384==
==6384== All heap blocks were freed -- no leaks are possible
==6384==
==6384== For lists of detected and suppressed errors, rerun with: -s
==6384== ERROR SUMMARY: 0 errors from 0 contexts (suppressed: 0 from 0)
The response from Valgrind indicates that all resources are successfully released and thus no memory leak will occur during and after the pipeline execution. Now we make sure that the pipeline is memory safe.
Conclusion and key takeways
Plugin architecture enables more flexibility and possibility of extending our program’s functionality while living to the Open-Close principle. And this architecture is possible thanks to the modularity nature of OOP languages such as C++. And in order to ensure memory-safety, we leverage the smart pointers to ensure memory release even at an adverse situation such as process interruption or in the event of unsuccessful plugin loading or plugin crashing. We also adopt a powerful debugging tool: Valgrind to help us evaluate thet plugin pipeline’s posibility of a memory leakage. I hope this article will help you in your future endeaor of developing your own plugin-based software using C++. Happy coding!