Sphero RVR+ setup part 1
Introduction
Let’s start with making sure that our rover can work as expected. Assume that you placed your order of a Sphero RVR+ and now it is delivered right to your doorstep. You unboxed the rover with all the excitement that has not appeared since you graduated from college. Now what?
What you will need
As you go through the rover’s getting started manual and check the items that come in the package: the programmable robot…OK it is not broken, 1 large battery bar…that goes in the robot you pressumed, 1 plastic key…that’s to lock the battery in place in the slot in the middle of the chasis, 1 USB charging cable…err that plugs directly to the battery and not the rover itself, 1 roll cage and 1 mounting plate…you don’t need it for the rest of the ride, 1 blueprint…this is the plate you think about mounting all the components on, 1 set of color cards…you don’t need these as you won’t be using the color sensor locating down to the ground at the buttom of the chasis.
You happily slice in the battery and lock it in place with the little key. Press the power button to turn on the rover and it swiftly answered with blinkinig flash lights. The game is on! You followed the instruction to installed the edu app to your tablet and successfully updated the robot firmware and able to remote control the robot with the tablet. Excellent!
But this is not all. For the subsequent project you will need:
- A computer running on Linux Ubuntu 22.04 LTS
- RSO 2 Humble
- At least 3 female-female jumper wires to connect between the UART pins of the dev kit and the rover.
- (Optional) A USB-jumper debug cable to facilitate the communication bewteen your laptop and the rover. The UART end should have at least 3 UART female connectors
- $\geq$ Python 3.12
Hardware setup
You need to understand how to connect the rover to the laptop and subsequently to the development kit. The easiest way is to test with the USB-UART deug cable but eventually you would like to move on to connecting diretly with jumper wires.
Since it is trickier to deal with connecting the UART pins between the dev kit and the robot, we will focus on this scenario first.
Connecting the Jetson Orin Nano to Sphero RVR+ (Data connection)
The Sphero RVR+ provides an UART interface consisting of TX, RX, 5VDC and GND pins. Here is how you connect them:
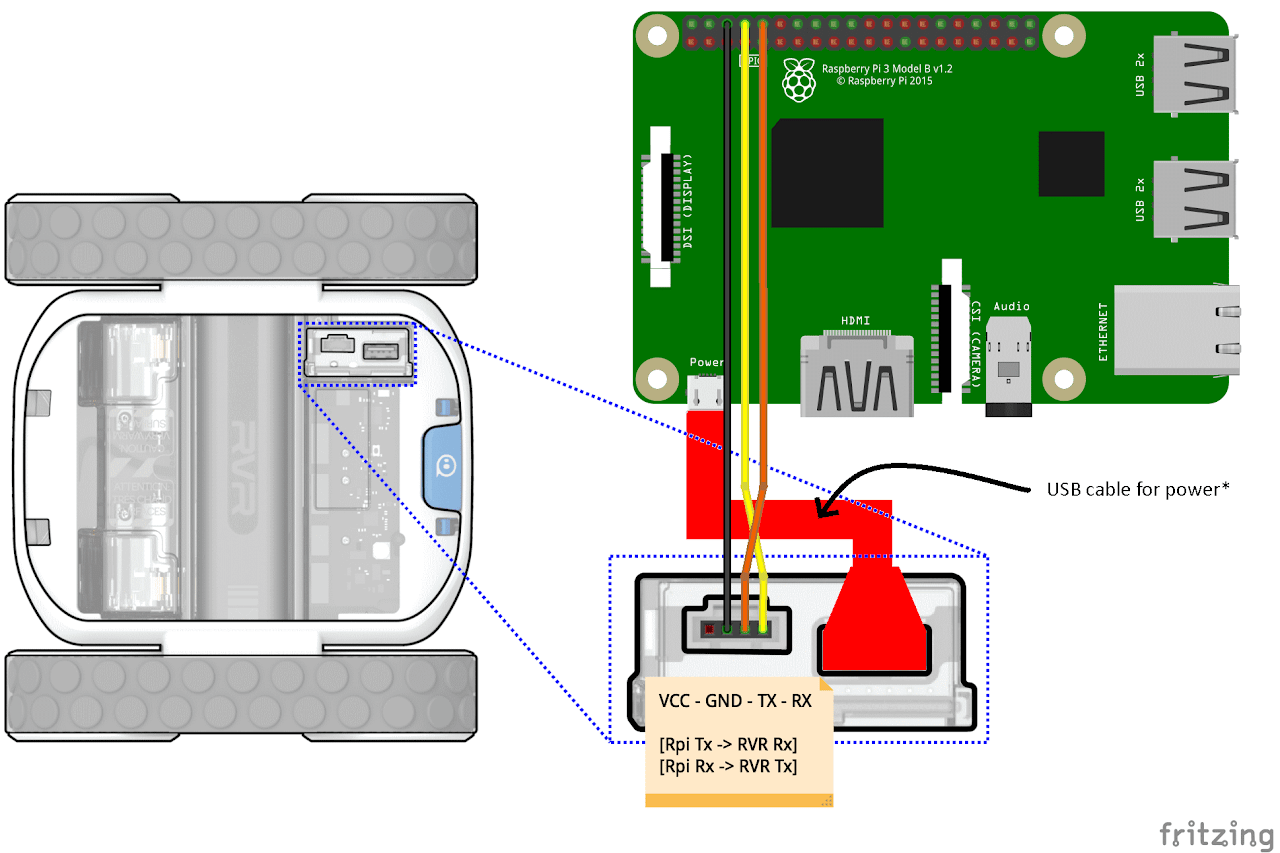
Source: Python SDK Setup (Quick Start)

Note: The UART on the Jetson Orin Nano is typically found on the J41 header. Please refer the pinout diagram at Jetson Orin Nano Expansion Header J12 Pinout. The relevant pins are:
- Pin 8 (TXD)
- Pin 10 (RXD)
- Pin 6 (GND)
Pin mapping
- RVR+ TX (Transmit) to Jetson Orin Nano RX (Received)
- RVR+ RX (Receive) to Jetson Orin Nano TX (Transmit)
- RVR+ GND to Jetson Orin Nano GND
Steps
-
Identify the UART pins to the Jetson Orin Nano’s. Typically these pins are available on the 40 pin header.
-
Use the jmper wires to connect following the instructions in the section Pin mapping.
-
Ensure the connections are secure.
-
Power the Jetson Orin Nano. The Jetson Orin Nano requires 5VDC power supply. You will power it with a power bank through the barrel jack. Note that the USB-C on the dev kit is not for charging.
Sphero RVR+              Jetson Orin Nano            External Power Bank
   5V  ------------------> (Not used for power)      USB-A ---------------\\
   GND ------------------> GND                     (via adapter)           |
   TX  ------------------> RX                                              |
   RX  ------------------> TX                                              |
                                            Power Input (Barrel Jack) <---/
Set up the udev rule on Jetson Orin Nano (server or robot host)
Git clone the sphero_rvr/install_udev_rule.sh to wherever in your Jetson Orin Nano home directory. You need the bash file under this cloned repository to set up your UART port access right.
Remove console logging
sudo nano /boot/firmware/cmdline.txt
Once open the file, remove the line console=serial0, 15200.
Install udev rules
Execute the bash file
chmod a+x install_udev_rule.sh      # if you haven't
bash install_udev_rule.sh
Reboot the machine to take effect.
One last thing. The “install_udev_rule.sh” copies the udev rule for Sphero RVR+ to /etc/udev/rules.d. You need to modify or add a udev rule as the UART port /dev/ttyS0 is for Raspberry Pi and not Jetson Orin Nano. Instead, for the latter the UART port is on /dev/ttyTHS0 or /dev/ttyTHS1.
So the newly added line under the sphero.rules file is as follows,
ACTION=="add", KERNEL=="ttyTHS1", MODE=="0666"
The “0666” means to grant everyone (even the ones outside of the dialout group) the read and write permission to the port.
This command is equivalent to the command that only changes temporary access right of the port:
sudo chmod a+rw /dev/ttyTHS1
Once this udev rule is saved, reboot to take effect.
To test whether the change already kicks in, you can run a simple serial communication Python script:
from serial import Serial

port_id = '/dev/ttyTHS1'
baud_rate = 115200

ser = Serial(port_id, baud_Rate)
print(ser)
If everything works accordingly, you can see the information of the serial instance printed out on the screen.
If you wnt to connect your RVR+ with your laptop or dev kit via a USB-UART cable
THe port to connect is by default /dev/ttyUSB0 which is distinct from the Raspberry Pi’s /dev/ttyS0 or the Jetson Orin Nano’s UART port at /dev/ttyTHS0.
Make sure that your /dev/ttyUSB0 port is granted read-write access to the dialout groupd for your user. On the terminal, first make sure the port exists:
ls | grep /dev/ttyUSB*
it should return at least the /dev/ttyUSB0 port. Probably a permission denied message will appear to the right of the port on your terminal. To grant access, use the following command:
sudo usermod -a -G dialout &USER
# and also
sudo chmod a+rw /dev/ttyUSB0
Once this command is inserted, log out and log back in to take effect.
Next time you can check whether the change in the access right with the command:
ll /dev/ttyUSB0

# then you should receive
crw-rw-rw- 1 root dialout 188, 0 Sep 29 14:04 /dev/ttyUSB0
from the first few characters (crw-rw-rw-), it is safe to say that the uer is already granted write and read access to the port. Now you are free to communicate with the robot via this port. Please following the same procedure to grant access to other port if it is not the displayed one above.
Final steps
- Double-check all connections
- Power on the external power bank to supply power to the Jetson Orin Nano
- Ensure the Sphero RVR+ is powered on and comunicating through the UART connection
If the dev kit is properly powered up and boot into the desktop, you are good to go. We will have another article to discuss how to set up the Jetson Orin Nano with ROS 2 Humble.
We are not done yet…
For the network and software configuration, please refer to the article Sphero RVR+ setup part 2. See you there.